Add Functionality to Your Crochet with a Sewn-in Zipper
Table of Contents
- Introduction
- Materials Needed
- Preparing the Crochet Pieces
- Positioning the Zipper
- Pinning the Zipper
- Sewing the Zipper
- Finishing Touches
- Conclusion
- FAQs
- Resources
Introduction
Welcome to Lighting Salt Crochet! In this tutorial, I will guide you through the process of sewing a zipper into your finished crochet pieces. Adding a zipper to your crochet items can provide functionality and enhance their overall appearance. By following these simple steps, you'll be able to sew a zipper into your crochet projects with ease.
Materials Needed
To sew a zipper into your crochet pieces, you'll need the following materials:
- Crochet pieces
- Zipper
- Straight pins
- Sewing needle
- Thread
- Scissors
Feel free to choose a thread color that matches your zipper or opt for a contrasting color to make your stitches more visible.
Preparing the Crochet Pieces
Before you begin sewing the zipper, it's important to make sure your crochet pieces are ready. Line them up and ensure they are even, as this will make it easier to center the zipper later on.
Positioning the Zipper
Next, take your zipper and center it on both crochet pieces. Determine the desired spacing between the zipper ends, keeping in mind that a small gap on each side can create a more aesthetically pleasing look.
Pinning the Zipper
To attach the zipper to your crochet pieces, start by pinning it to the front piece. With the wrong side facing up, line up the edge of the zipper with the edge of the crochet piece. The zipper teeth should be just above the crochet edge. Pin it in place with three pins, ensuring the zipper is open.
Flip the piece over and double-check the position of the teeth, making sure they are still slightly above the crochet edge. Once you're satisfied, bring in the second crochet piece and repeat the pinning process.
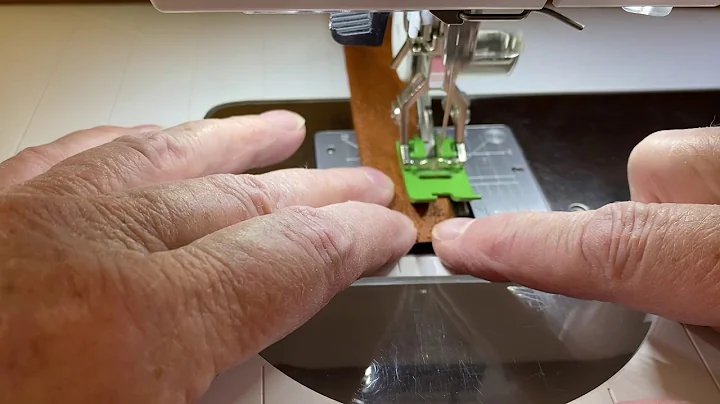
Sewing the Zipper
With your contrasting-colored thread and a sewing needle, secure the first pin in place. Start sewing a running stitch along the zipper stop, ensuring your stitches are shallow and don't go all the way through to the other side of the yarn. This will prevent the thread from being visible on the front side of the crochet piece. Continue sewing all the way around the zipper, making sure it is securely attached.
Finishing Touches
Once you've sewn the zipper in place, flip the piece over and zip it up to check the positioning and overall appearance. The fabric of the zipper should be neatly aligned with the crochet edges. Trim any excess thread if necessary.
To seam the open edges of the crochet piece, start from the end of the zipper and stitch down to close the opening. Sew along the edge, around, and back up to where the zipper ends, matching the stitch length and style to the rest of the piece.
Conclusion
Sewing a zipper into your crochet pieces can elevate their functionality and add a professional touch. By following these step-by-step instructions, you can confidently incorporate zippers into your crochet projects. Experiment with different zipper colors and finishes to create unique and personalized pieces.
FAQs
Q: Can I use this technique for any crochet project?
A: Yes, you can use this technique for a wide range of crochet projects, including bags, pouches, and garments. However, it's important to adapt the zipper length and positioning based on the specific project requirements.
Q: Do I need advanced sewing skills to sew a zipper into my crochet pieces?
A: No, basic sewing skills are sufficient to sew a zipper into your crochet pieces. The running stitch used in this tutorial is simple and effective.
Q: Can I machine-sew the zipper instead of hand-sewing?
A: Yes, you can use a sewing machine to attach the zipper to your crochet pieces. However, hand-sewing offers more control and precision, especially for smaller crochet projects.
Resources