Upgrade Your Hyundai Sonata's Backup Camera for a Clear and Crisp Image
Table of Contents
- Introduction
- Issue with the Backup Camera
- Removing the Trunk Cover
- Accessing the Camera
- Removing the Old Camera
- Installing the New Camera
- Reassembling the Trunk Cover
- Testing the New Camera
- Conclusion
- FAQs
Article
🔔 Upgrading your Hyundai Sonata's Backup Camera: A Step-by-Step Guide
Are you experiencing issues with your 2015 Hyundai Sonata's backup camera? Are you frustrated with the hazy and blurry image it provides? Don't worry, because in this guide, we will walk you through the process of upgrading your backup camera to improve its clarity and functionality. By the end of this article, you'll have the knowledge and confidence to install a new camera and enjoy a crystal clear view while reversing your vehicle. Let's get started!
🚗 Introduction
The backup camera is an essential safety feature in modern vehicles, providing drivers with a clear view of what's behind them. However, over time, these cameras can become hazy, blurry, or even stop working altogether. In this guide, we will focus on the 2015 Hyundai Sonata and address the common issue of a degraded backup camera image.
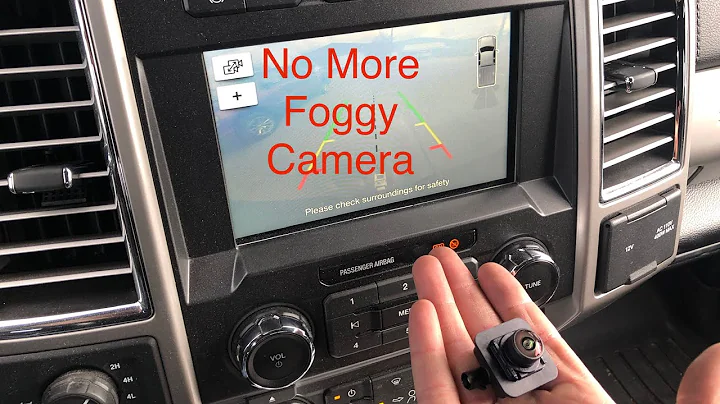
📷 Issue with the Backup Camera
When you put your Hyundai Sonata in reverse, you may have noticed that the backup camera's image appears hazy and distorted. The only clear area is a small portion, while the rest of the screen is clouded and grainy. This can be frustrating and make reversing your vehicle more challenging.
🛠️ Removing the Trunk Cover
To access the backup camera, we first need to remove the trunk cover. The cover is held in place by several plastic clips, which can be easily removed using a pry tool. Carefully pry out the clips and set them aside. Once all the clips are removed, the trunk cover should come off easily.
📸 Accessing the Camera
With the trunk cover removed, we gain access to the rear view camera, which is mounted at the back of the vehicle. Take a closer look, and you'll notice that the camera lens is corroded, shattered, and distorted. This is the main cause of the hazy and blurry image.
🔄 Removing the Old Camera
Now that we have identified the problem, it's time to remove the old camera. The camera is connected to the vehicle's wiring harness with a single clip. Press down on the clip to release it and carefully pull out the connector. With the connector detached, the camera can be easily removed from its mount, allowing us to replace it with a new one.
⚙️ Installing the New Camera
To install the new camera, align it with the mounting hole and press it firmly until it snaps into place. The new camera should fit perfectly and sit flush with the surrounding surface. Once the camera is securely installed, reconnect the wiring harness by inserting the connector until it clicks into place.
🛠️ Reassembling the Trunk Cover
With the new camera in place, it's time to reassemble the trunk cover. Start by aligning the cover with the mounting points and gently press it down. Make sure all the plastic clips are properly inserted, securing the cover in place. Finally, check that the cover sits flush and there are no visible gaps.
✔️ Testing the New Camera
Before finishing up, it's important to test the new camera to ensure it's functioning correctly. Turn on the ignition, put the vehicle in reverse, and check the display screen. You should now see a clear and crisp image from the backup camera. If everything looks good, you can proceed to the final step.
🏁 Conclusion
Congratulations! You have successfully upgraded your Hyundai Sonata's backup camera. With the new camera in place, you can enjoy a clear and reliable view while reversing your vehicle. Remember, if you have any doubts or concerns, it's always recommended to consult a professional.
📚 Resources
🙋♀️ FAQs
Q: How much does a replacement backup camera for a Hyundai Sonata cost?
A: The cost of a replacement backup camera can vary depending on the year and model of your Hyundai Sonata. On average, these cameras can range from $150 to $300.
Q: Can I install the new backup camera myself, or do I need professional assistance?
A: While it is possible to install the new backup camera yourself following a guide like this one, it's always recommended to seek professional assistance if you're unsure or uncomfortable with the process.
Q: Are backup cameras in Hyundai Sonatas prone to moisture damage?
A: Yes, some Hyundai Sonatas may experience moisture-related issues with their backup cameras, resulting in a blue screen. If you're facing this issue, check out the linked video in the resources section for a solution.
Q: Can I upgrade my backup camera to a higher resolution or wider-angle lens?
A: While it may be possible to upgrade the backup camera to a higher resolution or wider-angle lens, it is essential to ensure compatibility with your vehicle and consult with experts for the best results.
Q: Are there any preventive measures I can take to prolong the lifespan of my backup camera?
A: Keeping your camera lens clean, protected from harsh weather conditions, and regularly inspecting the wiring connections can help maintain the longevity of your backup camera.