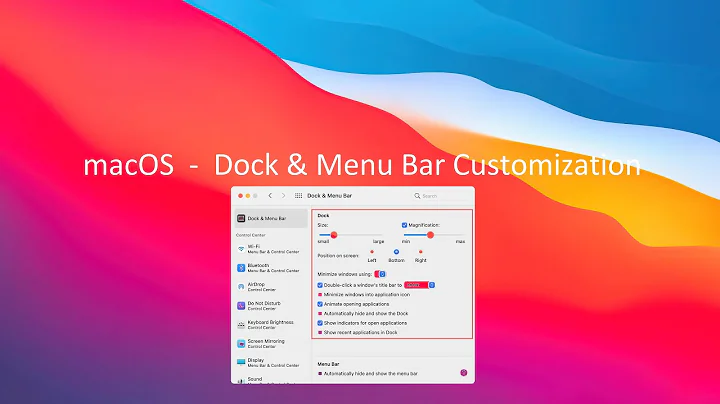
Master Dryer Repair: Step-by-Step Guide
Table of Contents:
- Introduction
- Precautions before Repairing a Dryer
- Removing the Dryer Door
- Replacing the Hinge
- Accessing Components Behind the Control Panel
- Replacing the Control Knob and User Control Board
- Reaching the Heating Element
- Replacing the Drive Motor or Blower Housing
- Removing the Front Panel
- Replacing the Drive Motor
- Accessing Parts Behind the Rear Panel
- Replacing the Water Inlet Valve
- Reassembling the Dryer
Introduction
Repairing a dryer can be a challenging task, but with the right knowledge and tools, it can be done safely and effectively. In this guide, we will walk you through the step-by-step process of repairing various components of a dryer. From removing the dryer door to accessing parts behind the rear panel, we will cover everything you need to know to get your dryer up and running again. So let's dive in and start repairing!
Removing the Dryer Door
Before you can start repairing your dryer, it is important to safely remove the dryer door. To do this, follow these steps:
- Unplug the power cord to ensure your safety.
- Open the dryer door and support it.
- Use a number two square bit or a Philips head screwdriver to unthread the screws securing the door to the hinge.
- Detach the door from the hinge.
Replacing the Hinge
If you need to replace the hinge of your dryer, here's what you should do:
- Unthread the screws securing the hinge to the frame.
- Use a small flathead screwdriver to help pull back the hinge plate.
- Rotate the hinge to detach it from the frame.
- Reinstall or replace the hinge by depressing the plate and inserting the hinge into the frame.
- Secure it by tightening the screws.
Accessing Components Behind the Control Panel
To access the components behind the control panel, follow these steps:
- Unthread the screws at the back securing the main top.
- Slide the main top back and lift it up to remove it.
- Unthread the screws securing the control panel mounting brackets to the frame.
- Lift the panel up and use a small flathead screwdriver to press the retaining tab and release the wire connector.
Replacing the Control Knob and User Control Board
If you need to replace the control knob or the user control board, follow these steps:
- Disconnect both the drum light wire connector and the user control board wire connector from the main control board.
- Unthread the control board support bracket screws and detach the bracket from the front bulkhead.
- Replace the control knob and the user control board.
Reaching the Heating Element
If you need to reach the heating element of your dryer, here's what you should do:
- Open the dryer door and unthread the two screws on the front panel securing the lint filter housing cover.
- Lift and support the dryer.
- Unthread the bottom front panel mounting screws and remove the support.
- Unthread the top front panel mounting screws and lift the panel out.
- Disconnect the door switch wire connector to fully remove the front panel.
- Disconnect both the drum light wire connector and the user control board wire connector from the main control board.
- Unthread the control board support bracket screws and detach the bracket from the front bulkhead.
- Unthread the lower bulkhead mounting screws.
- Lift the front bulkhead up to detach it from the frame.
- Reach under the drum and unthread the belt from the pulley and motor shaft.
- Use the belt to help lift out the drum.
- Replace the heating element if needed.
Replacing the Drive Motor or Blower Housing
To replace the drive motor or blower housing of your dryer, follow these steps:
- Open the dryer door and unthread the two screws on the front panel securing the lint filter housing cover.
- Lift and support the dryer.
- Unthread the bottom front panel mounting screws and remove the support.
- Unthread the top front panel mounting screws and lift the panel out.
- Disconnect the door switch wire connector to fully remove the front panel.
- Disconnect both the drum light wire connector and the user control board wire connector from the main control board.
- Unthread the control board support bracket screws and detach the bracket from the front bulkhead.
- Unthread the lower bulkhead mounting screws.
- Lift the front bulkhead up to detach it from the frame.
- Detach the spring from the idler arm and lift off the idler assembly.
- Disconnect the motor wire harness.
- Secure the motor shaft and unthread the blower wheel by rotating it clockwise.
- Pry the motor retaining bracket off using a large flathead screwdriver.
- Lift out the old motor and install the new drive motor.
- Reassemble the dryer.
Removing the Front Panel
To remove the front panel of your dryer, follow these steps:
- Open the dryer door and unthread the two screws on the front panel securing the lint filter housing cover.
- Lift and support the dryer.
- Unthread the bottom front panel mounting screws and remove the support.
- Unthread the top front panel mounting screws and lift the panel out.
- Disconnect the door switch wire connector to fully remove the front panel.
Replacing the Drive Motor
If you need to replace the drive motor of your dryer, here's what you should do:
- Open the dryer door and unthread the two screws on the front panel securing the lint filter housing cover.
- Lift and support the dryer.
- Unthread the bottom front panel mounting screws and remove the support.
- Unthread the top front panel mounting screws and lift the panel out.
- Disconnect the door switch wire connector to fully remove the front panel.
- Disconnect both the drum light wire connector and the user control board wire connector from the main control board.
- Unthread the control board support bracket screws and detach the bracket from the front bulkhead.
- Unthread the lower bulkhead mounting screws.
- Lift the front bulkhead up to detach it from the frame.
- Reach under the drum and unthread the belt from the pulley and motor shaft.
- Use the belt to help lift out the drum.
- Detach the spring from the idler arm and lift off the idler assembly.
- Disconnect the motor wire harness.
- Secure the motor shaft and unthread the blower wheel by rotating it clockwise.
- Pry the motor retaining bracket off using a large flathead screwdriver.
- Lift out the old motor and install the new drive motor.
Accessing Parts Behind the Rear Panel
To access parts behind the rear panel of your dryer, follow these steps:
- Close the water supply valve and remove the water supply line from the inlet valve.
- Remove the screws to release the main top mounting bracket.
- Remove the screw to release the rear access panel.
- Remove the screw to release the rear panel.
- Detach the rear panel to access the rear heat duct, the heat duct thermistor, and the water inlet valve.
Replacing the Water Inlet Valve
If you need to replace the water inlet valve of your dryer, here's what you should do:
- Disconnect the wire harness from the old water inlet valve.
- Depress the locking ring to detach the water line.
- Unthread the mounting screws and remove the old valve.
- Install the new water inlet valve by inserting it in the rear bulkhead and securing it with the screws.
- Connect the water line and the wire harness to the new valve.
Reassembling the Dryer
To reassemble your dryer after repairing it, follow these steps:
- Reposition the rear panel and replace all the mounting screws.
- Align the longer screws above the exhaust vent.
- Connect the power cord wires to the appropriate terminals on the terminal block and secure them with the screws.
- Replace the rear access panel and secure it with the screw.
- Realign the main top mounting bracket and replace the screws.
- Attach the water supply line to the inlet valve.
- Realign the main top and slide it into place.
- Thread the screws in the back to secure it.
- Reopen the water supply valve.
- Plug the power cord back in.
Conclusion
Repairing a dryer may seem daunting, but with the right instructions and precautions, it can be done successfully. By following the steps outlined in this guide, you can safely remove and replace various components of your dryer, such as the door, hinge, control panel, heating element, drive motor, blower housing, and more. Remember to always unplug the power cord and take necessary safety measures before starting any repair. With a little patience and the right tools, you can have your dryer up and running again in no time!
Pros:
- Provides step-by-step instructions for repairing a dryer
- Covers a wide range of components and issues
- Includes precautions to ensure safety
- Written in a clear and concise manner
Cons:
- Assumes basic knowledge of tools and electrical safety
- May require some technical expertise
Highlights:
- Learn how to safely repair your dryer
- Step-by-step instructions for removing and replacing various components
- Get your dryer up and running again in no time
FAQ:
Q: Are all dryers the same when it comes to repairing?
A: While the general steps for repairing dryers are similar, the specific components and procedures may vary between different models and brands. It is always best to consult your dryer's manual or seek professional assistance if you are unsure.
Q: What precautions should I take before repairing my dryer?
A: Before starting any repair, it is crucial to unplug the power cord and ensure that the dryer is completely disconnected from its power source. Additionally, wearing protective gear such as gloves and safety glasses is recommended.
Q: Can I repair my dryer myself, or do I need professional help?
A: Many dryer repairs can be done by individuals with basic technical skills and the right tools. However, if you are uncomfortable or unsure about any aspect of the repair process, it is always best to seek professional assistance to avoid any potential hazards or further damage.
Resources:
- [link] (URL for dryer repair tutorials)
- [link] (URL for dryer parts supplier)
- [link] (URL for professional dryer repair service)